Harvia Pro 20 24.1kW Wood Burning Sauna Stove Kit w/ Chimney, Sheath, Floor Protection and Stones
Harvia Pro 20 24.1 kW wood-burning stove with the WHP1500 chimney, WL550 sheath, WL100 bedding and 88 lb of stones, for 283–706 cu ft saunas
In stock
Estimated delivery
7–12 days after you order
- Stove, chimney, sheath, bedding and stones in one order
- Two boxes of AC3020 stones: the Pro 20's full 88 lb load
- Wood-fired: no electrical hookup needed


- Description
- What's Included
- Specifications
- Installation
- Documents
- Warranty
What is the Harvia Pro 20 kit with chimney, sheath, floor protection and stones?
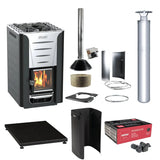
The Harvia Pro 20 kit combines five parts: the Harvia Pro 20 (WKPR20M) 24.1 kW wood-burning sauna stove, Harvia's WHP1500 chimney kit in stainless steel, the WL550 three-sided protective sheath, the WL100 protective bedding and two 44 lb boxes of Harvia AC3020 stones. It is sized for sauna rooms of 283 to 706 cu ft. The kit price is the sum of the five parts.
The parts are matched to the stove: Harvia's Pro 20 manual names the WHP1500 chimney, the WL550 sheath and the WL100 bedding for it, and two boxes of AC3020 cover its 88 lb stone load. The Pro 20 burns firewood and needs no electrical connection. The Harvia Pro 20 is also sold on its own, and the Harvia wood-burning stove collection has every Harvia wood-burning stove Topture sells.
Harvia Pro 20 kit key features
- Harvia Pro 20 stove, 24.1 kW, for sauna rooms of 283–706 cu ft (8–20 m³)
- Harvia WHP1500 chimney kit in stainless steel: a 59.1" insulated chimney and a 39.4" smoke pipe
- WL550 three-sided protective sheath: 2.4" to combustible walls at the sides and rear
- WL100 protective bedding for a tile or combustible floor
- Two 44 lb boxes of AC3020 stones: the Pro 20's full 88 lb stone load
- Stove CE marked (EN 15821); chimney CE marked to EN 1856-1 (T600 N1 D Vm-L20070 G100)
What's included in the Harvia Pro 20 kit?
Harvia Pro 20 stove (WKPR20M)
- Harvia Pro 20 wood-burning sauna stove with its glass door, ash box and adjustable legs
- Flue connection pipe, and a blocking plug for the connection opening you don't use
- Soot-opening stoppers and a tool for opening the hot door and ash box
- Installation and user manual
Harvia WHP1500 chimney kit
- Double-wall insulated steel chimney, 59.1" (1.5 m) in two sections, 8.66" (220 mm) across
- Single-wall stainless smoke pipe, 39.4" (1.0 m), cut to length
- Rain cap
- Rubber rain flange with its installation set, for roofs pitched 10° or more
- Lead-through insulation and lead-through protector
- Lead-through flange for the ceiling opening
- Clamp
- Installation instructions
Harvia WL550 protective sheath
- Three-sided WL550 protective sheath in black-painted steel
- Installation instructions
Harvia WL100 protective bedding
- WL100 protective bedding, 18.5" × 26.2" (470 × 665 mm), black-painted aluminum-zinc-coated steel on adjustable feet
- Installation instructions
Harvia AC3020 stones
- Two 44 lb (20 kg) boxes, 88 lb in all, of Harvia AC3020 split-face olivine diabase stones, 4–6" (10–15 cm)
What you still need
- The chimney installation through the ceiling and roof, following Harvia's WHP1500 instructions and your local code
- On a combustible floor: non-combustible protection in front of the stove door
- On a flat roof: the WHM24 rain flange (sold separately)
- Optional: the Harvia WP220ST water heater, which Harvia lists for the Pro 20
- Optional: the Harvia WZ115155 pipe adapter, for North American 6" chimney pipe
Harvia Pro 20 stove specifications
| Output | 24.1 kW |
|---|---|
| Sauna room volume | 283–706 cu ft (8–20 m³) |
| Minimum room height | 82.3" (2,090 mm) (Harvia data sheet) |
| Top of the stove to the ceiling | 51.2" (1,300 mm) |
| Dimensions | 16.9" W × 20.1" D × 29.9–31.1" H (430 × 510 × 760–790 mm), with the adjustable legs |
| Legs | Adjustable, 0–1.2" (0–30 mm) |
| Net weight | 116.8 lb (53 kg) |
| Stones | Up to 88 lb (40 kg) of 4–6" (10–15 cm) stones; the kit includes two 44 lb boxes of AC3020 |
| Chimney connection | Top or rear, 4.5" (115 mm); chimney class T600 with a flue at least 4.3" (110 mm) across; rear opening centered 22.0" (560 mm) above the floor |
| Firewood | Up to 15.4" (390 mm) long, 3.1–5.9" (8–15 cm) across |
| Materials | Steel; the outer casing is painted graphite black (Harvia); glass door |
| Electrical connection | None; wood-fired |
| Certification | CE marked (EN 15821) |
| Harvia part number | WKPR20M (GTIN 6417659036528); earlier item code WK200 |
| Warranty | 2-year manufacturer warranty; stones are not covered |
Harvia WHP1500 chimney kit specifications
| Chimney | 59.1" (1.5 m), double-wall, mineral-wool insulated, 8.66" (220 mm) outer diameter |
|---|---|
| Smoke pipe | 39.4" (1.0 m), single-wall, cut to length; joins the 4.5" (115 mm) top opening of the Pro 20 |
| Roof | Pitched 10° or more; a flat roof needs the WHM24 rain flange, sold separately |
| Maximum total height | 16.4 ft (5.0 m) with WHP500 or WHP1000 chimney extensions, sold separately; vertical installation only |
| Clearance to combustibles | 3.94" (100 mm) from the insulated casing; 19.7" (500 mm) from the uninsulated smoke pipe |
| Below the ceiling | At least 16.9" (430 mm) of insulated chimney visible |
| Flue-gas temperature class | T600, up to 1,112°F (600°C) |
| Certification | CE marked to EN 1856-1 (T600 N1 D Vm-L20070 G100) |
| Materials | Stainless-steel chimney casing and smoke pipe; mineral-wool insulation |
| Warranty | 2-year manufacturer warranty |
Harvia WL550 sheath and WL100 bedding specifications
| WL550 size | 19.6" × 22.4" × 32" (497 × 568 × 812 mm) |
|---|---|
| Distances with the WL550 fitted | Sides and rear 2.4" (62 mm); front 16.6" (422 mm); sheath to wall 1.2" (30 mm) |
| WL100 size | 18.5" × 26.2" (470 × 665 mm), 2.4–3.0" (60–75 mm) high on adjustable feet |
| Materials | Black-painted steel sheath; black-painted aluminum-zinc-coated steel bedding |
| Warranty | 2-year manufacturer warranty on each |
How is the Harvia Pro 20 kit installed?
The Harvia Pro 20 stands on its adjustable legs on the WL100 bedding, with the WL550 sheath around it, and the WHP1500 chimney rises from the stove's top opening through the ceiling and roof. Harvia's manual says all local regulations apply, that the stove is not suitable for a shared flue, that no electrical devices, wires or combustible materials may sit within the safety distances, and that the local fire authorities can give detailed fire-safety requirements. Harvia's manuals, under Documents, give the step-by-step installation of the stove, the chimney, the sheath and the bedding.
What floor does the Harvia Pro 20 kit need?
The Harvia Pro 20 kit's WL100 bedding is the protection Harvia's manual asks for under the Pro 20 on a tile floor, whose adhesives and waterproofing do not resist the stove's heat, and on a floor made of combustible material. A combustible floor also needs non-combustible protection in front of the stove door, which the kit does not include. A bare concrete floor at least 2.4" (60 mm) thick needs no protection. The floor must be strong enough to carry the stove.
Harvia Pro 20 kit safety distances
Keep at least these distances between the Harvia Pro 20 and anything that can burn.
| Top of the stove to the ceiling | 51.2" (1,300 mm) |
|---|---|
| Sides to combustible material | 11.8" (300 mm) |
| Rear to combustible material | 11.8" (300 mm) |
| Front to combustible material | 11.8" (300 mm) |
| To a masonry wall | 2.0" (50 mm) if air can circulate in front and at one side; 3.9" (100 mm) in a recess |
| Sides | 2.4" (62 mm) |
|---|---|
| Rear | 2.4" (62 mm) |
| Front | 16.6" (422 mm) |
| Sheath to wall | 1.2" (30 mm) |
With the WL550 fitted, the side and rear distances fall to 2.4" (62 mm) and the front distance grows to 16.6" (422 mm).
Connecting the kit's chimney
The kit's Harvia WHP1500 chimney kit joins the Pro 20's 4.5" (115 mm) top opening with a smoke pipe cut to length; the rear opening stays closed with the blocking plug. It installs vertically only, suits roofs pitched 10° or more, and needs 3.94" (100 mm) from its insulated casing and 19.7" (500 mm) from the uninsulated smoke pipe to anything that can burn. The WHP1500 page gives the full roof and ceiling requirements.
Does the Harvia Pro 20 kit need a first firing?
Yes, outdoors. Harvia's manual says to fire the Pro 20 once outside before its first sauna, until the paint on the stove stops smoking, and to load the stones only after it has cooled.
Harvia Pro 20, Pro 26, Pro 36, Linear 22 and Linear 28 Installation and User Manual
Harvia WHP1500 Chimney Kit Installation Instructions
Harvia Wood Stove Safety Distances (M3, Pro and Linear)
Bathing Brands Harvia Stone Requirements Chart
Harvia Protective Sheath (WL400 to WL850) Installation Instructions