Harvia M3 SL Wood Sauna Stove
Harvia M3 SL 16.5 kW wood-burning sauna stove, loaded through the wall from the next room, for 212–459 cu ft rooms
In stock
Estimated delivery
7–12 days after you order
- Loaded from the next room: firewood and ash stay outside the sauna
- Up to 66 lb of 4–6" stones
- Wood-fired: no electrical hookup needed


- Description
- Specifications
- Installation
- What's Included
- Documents
- Warranty
What is the Harvia M3 SL wood-burning sauna stove?
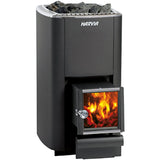
The Harvia M3 SL (WKM3SL) is a 16.5 kW wood-burning sauna stove for sauna rooms of 212 to 459 cu ft, loaded from the next room: its fire chamber extends through the wall, so firewood and ash stay outside the sauna. It stands on the floor, has a black-painted steel body with a glass door and an ash box, holds up to 66 lb (30 kg) of 4–6" stones, and connects to the chimney at the top only, through a 4.5" (115 mm) opening. It needs no electrical connection.
The Harvia M3 is the same stove loaded from inside the sauna, with a top or rear connection, and Topture also sells it in three kits with the chimney and stones. The Harvia Legend 150 SL is a through-the-wall stove for the same room size with a much larger stone load. The Harvia wood-burning stove collection has every Harvia wood-burning stove Topture sells.
Harvia M3 SL key features
- 16.5 kW for sauna rooms of 212–459 cu ft (6–13 m³)
- Loaded from the next room through a fire-chamber extension
- Up to 66 lb (30 kg) of 4–6" stones
- Top chimney connection only, 4.5" (115 mm)
- Black-painted steel body, glass door and ash box
- Takes firewood up to 13.8" (350 mm) long
- CE marked (EN 15821)
- 2-year manufacturer warranty
Does the Harvia M3 SL fit my sauna?
The Harvia M3 SL heats sauna rooms of 212 to 459 cu ft (6–13 m³). Harvia's manual adds 1.2 m³ for every square meter of uninsulated brick, glass block, glass, concrete or tile wall, about 3.9 cu ft per sq ft, and a glass door counts: its example is a 10 m³ room with a glass door, which needs the output of a 12 m³ room. Multiply the volume of a solid-log sauna by 1.5. The M3 SL needs at least 47.2" (1,200 mm) between the top of the stove and the ceiling.
Harvia M3 SL specifications
| Output | 16.5 kW |
|---|---|
| Sauna room volume | 212–459 cu ft (6–13 m³) |
| Dimensions | 15.4" W × 25.2" D × 28.1" H (390 × 430 + 210 mm fire-chamber extension × 715 mm, Harvia manual) |
| Legs | Fixed; the M3 SL has no adjustable legs |
| Net weight | 105.8 lb (48 kg), Harvia data sheet |
| Stones | Up to 66 lb (30 kg) of 4–6" (10–15 cm) stones; two 44 lb boxes of Harvia AC3020 cover it |
| Chimney connection | Top only, 4.5" (115 mm); chimney class T600 with a flue at least 4.3" (110 mm) across |
| Wall opening | 8.7" (220 mm) wide, bottom at least 15.4" (390 mm) above the floor; wall at most 5.9" (150 mm) thick |
| Firewood | Up to 13.8" (350 mm) long, 3.1–5.9" (8–15 cm) across |
| Materials | Black-painted steel body (heat-resistant paint); glass door |
| Electrical connection | None; wood-fired |
| Certification | CE marked (EN 15821) |
| Harvia part number | WKM3SL (GTIN 6417659001151) |
| Packed for shipping | Stove only: 111.6 lb (50.6 kg), carton 28.7" W × 30.1" H × 16.3" D |
| Warranty | 2-year manufacturer warranty; stones are not covered |
How is the Harvia M3 SL installed?
The Harvia M3 SL stands on a floor strong enough to carry it and its stones, on its fixed legs, inside the safety distances below, and connects to a T600 chimney. Harvia's manual says all local regulations apply, that the stove is not suitable for a shared flue, and that the local fire authorities can give detailed fire-safety requirements. Harvia's installation manual, under Documents, gives the step-by-step installation and the chimney connection.
What wall opening does the Harvia M3 SL need?
The Harvia M3 SL is loaded from the room next to the sauna: its fire-chamber extension passes through an opening in a concrete or brick wall. Harvia's SL instructions give the opening as 8.7" (220 mm) wide, with its bottom at least 15.4" (390 mm) above the floor, in a wall no thicker than 5.9" (150 mm); they also set the opening's distance to the side wall and ceiling. The non-combustible wall the stove passes through must reach the roof, and combustible structures must stay at least 3.9" (100 mm) from the chimney's outer casing.
Does the Harvia M3 SL need floor protection?
It depends on the floor under the Harvia M3 SL. A bare concrete floor at least 2.4" (60 mm) thick needs no protection. A tile floor needs Harvia protective bedding or similar heat-radiation protection, because the adhesives and waterproofing under tile do not resist the stove's heat. A floor made of combustible material needs the bedding too, plus non-combustible floor protection, at least 17.7" × 31.5" (450 × 800 mm), in front of the stove door on the loading side. Harvia's manual names the WL100 or WL110 bedding for the M3 SL; the Harvia WL100 protective bedding (Protective Bedding SM) and the Harvia WL110 protective bedding (Protective Bedding LG) are sold separately, and neither comes with the stove.
Harvia M3 SL safety distances
Keep at least these distances between the Harvia M3 SL and anything that can burn.
| Top of the stove to the ceiling | 47.2" (1,200 mm) |
|---|---|
| Sides to combustible material | 9.8" (250 mm) |
| Rear to combustible material | 11.8" (300 mm) |
| Front to combustible material | 11.8" (300 mm) |
| Loading side, in front of the door | 19.7" (500 mm) to combustible material |
| To a masonry wall | 2.0" (50 mm) if air can circulate in front and at one side; 3.9" (100 mm) in a recess |
| Sides | 2.0" (50 mm) |
|---|---|
| Rear | 2.0" (50 mm) |
| Front | 11.8" (300 mm) |
| Sheath to wall | 1.2" (30 mm) |
The shorter distances apply only with the sheath fitted; without it, use the first table.
Connecting the Harvia M3 SL to a chimney
The Harvia M3 SL connects at the top through a 4.5" (115 mm) opening, to a chimney of temperature class T600 with a flue at least 4.3" (110 mm) across; it cannot share a flue with another fireplace. The Harvia WHP1500 chimney kit (sold separately) fits the top opening, and its page gives the roof and clearance requirements. For North American 6" chimney pipe, the Harvia WZ115155 pipe adapter (sold separately) adapts the opening.
Does the Harvia M3 SL need a first firing?
Yes, outdoors. Harvia's manual says to fire the M3 SL once outside before its first sauna, until the paint on the stove stops smoking, and to load the stones only after it has cooled.
What's in the box with the Harvia M3 SL?
- Harvia M3 SL wood-burning sauna stove with its fire-chamber extension, glass door and ash box
- Installation and user manual
What you need separately
- Two 44 lb boxes (88 lb) of Harvia AC3020 4–6" stones
- A chimney: the Harvia WHP1500 chimney kit in stainless steel or black, or a T600 masonry flue
- On a tile or combustible floor: the Harvia WL100 protective bedding (Protective Bedding SM), plus non-combustible protection of at least 17.7" × 31.5" in front of the door on the loading side on a combustible floor
- Optional: the Harvia WL450 protective sheath, which cuts the side and rear distances to 2"
- Optional: the Harvia WP220ST water heater, which Harvia lists for the M3 SL
- Optional: the Harvia WZ115155 pipe adapter, for North American 6" chimney pipe