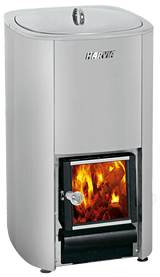
Harvia Cauldron 50 Liter Wood Burning Water Heater | WP500
Harvia WP500 Cauldron: a stand-alone wood-fired water heater with a 50 L (13.2 gal) removable stainless-steel inner cauldron
In stock
Estimated delivery
7–12 days after you order
- 50 L (13.2 gal) removable stainless-steel inner cauldron with a lid
- Its own fire chamber, which Harvia makes replaceable
- Wood-fired: no electrical hookup needed
- Description
- Specifications
- Installation
- What's Included
- Documents
- Warranty
What is the Harvia WP500 Cauldron?
The Harvia WP500 Cauldron is a stand-alone, wood-fired water heater that holds 50 liters (13.2 gal) of water in a removable stainless-steel inner cauldron with a lid. It has its own fire chamber, door and ash box, stands on the floor on adjustable legs, and connects to a T600 chimney through a 4.5" (115 mm) opening at the rear. It is not a sauna heater: it heats water for washing, in a sauna or a cottage.
For a water heater that mounts on the smoke pipe of a stove instead, see the Harvia WP250LD Legend water heater for Legend stoves and the Harvia WP220ST water heater. The Harvia wood-burning stove collection has every Harvia wood-burning stove Topture sells.
Harvia WP500 Cauldron key features
- 50 L (13.2 gal) removable stainless-steel inner cauldron with a lid
- Its own fire chamber, which Harvia makes replaceable, plus a door and ash box
- Rear chimney connection, 4.5" (115 mm), center 22.8" (580 mm) above the floor
- Adjustable legs, 0–1.2" (0–30 mm)
- Takes firewood up to 15.4" (390 mm) long
- CE marked
- 2-year manufacturer warranty
How much room does the Harvia WP500 Cauldron need?
The Harvia WP500 Cauldron holds 50 liters (13.2 gal). Harvia's manual says it needs at least 39.4" (1,000 mm) above it to the ceiling and at least 10.8 sq ft (1 m²) of floor space in front of it for use and maintenance. It does not heat the sauna room; a sauna needs its own heater.
Harvia WP500 Cauldron specifications
| Water volume | 50 L (13.2 gal) |
|---|---|
| Dimensions | 17.1" W × 19.7" D × 30.3–31.5" H (435 × 500 × 770 mm, plus 0–30 mm of leg travel) |
| Weight | 79.4 lb (36 kg) |
| Chimney connection | Rear, 4.5" (115 mm), center 22.8" (580 mm) above the floor; chimney class T600 with a flue at least 4.3" (110 mm) across |
| Firewood | Up to 15.4" (390 mm) long |
| Materials | Steel casing; stainless-steel inner cauldron |
| Certification | CE marked; EAC |
| Harvia part number | WP500 (GTIN 6417659001502) |
| Warranty | 2-year manufacturer warranty |
How is the Harvia WP500 Cauldron installed?
The Harvia WP500 Cauldron stands on a floor strong enough to carry it full of water, on adjustable legs, inside the safety distances below, and connects to a T600 chimney at the rear. Harvia's installation manual, under Documents, gives the step-by-step installation and the chimney connection.
Does the Harvia WP500 Cauldron need floor protection?
It depends on the floor under the Harvia WP500 Cauldron. Harvia's manual says a tile floor or a floor made of combustible material must be protected with Harvia's WX018 protective bedding or similar heat-radiation protection, and a combustible floor also needs spark protection in front. The bedding is not included.
Harvia WP500 Cauldron safety distances
Keep at least these distances between the Harvia WP500 Cauldron and walls, benches and the ceiling.
| Top of the cauldron to the ceiling | 39.4" (1,000 mm) |
|---|---|
| Sides to combustible walls and benches | 9.8" (250 mm) |
| Front to combustible material | 19.7" (500 mm) |
| To a masonry wall | 2.0" (50 mm) if air can circulate in front and at one side; 3.9" (100 mm) in a recess |
| Beside a wood-burning stove | 9.8" (250 mm), or 2.4" (60 mm) with a non-combustible sheath between them |
| Space for use | At least 10.8 sq ft (1 m²) in front |

Connecting the Harvia WP500 Cauldron to a chimney
The Harvia WP500 Cauldron connects at the rear through a 4.5" (115 mm) opening, to a chimney of temperature class T600 with a flue at least 4.3" (110 mm) across. For North American 6" chimney pipe, the Harvia WZ115155 pipe adapter (sold separately) adapts the opening.
What's in the box with the Harvia WP500 Cauldron?
- Harvia WP500 Cauldron with its lid, removable inner cauldron, fire chamber, door and ash box
- Installation and user manual
What you need separately
- A chimney with a T600 flue at least 4.3" (110 mm) across
- On a tile or combustible floor: Harvia's WX018 protective bedding or similar heat-radiation protection, plus spark protection in front on a combustible floor
- Optional: the Harvia WZ115155 pipe adapter, for North American 6" chimney pipe